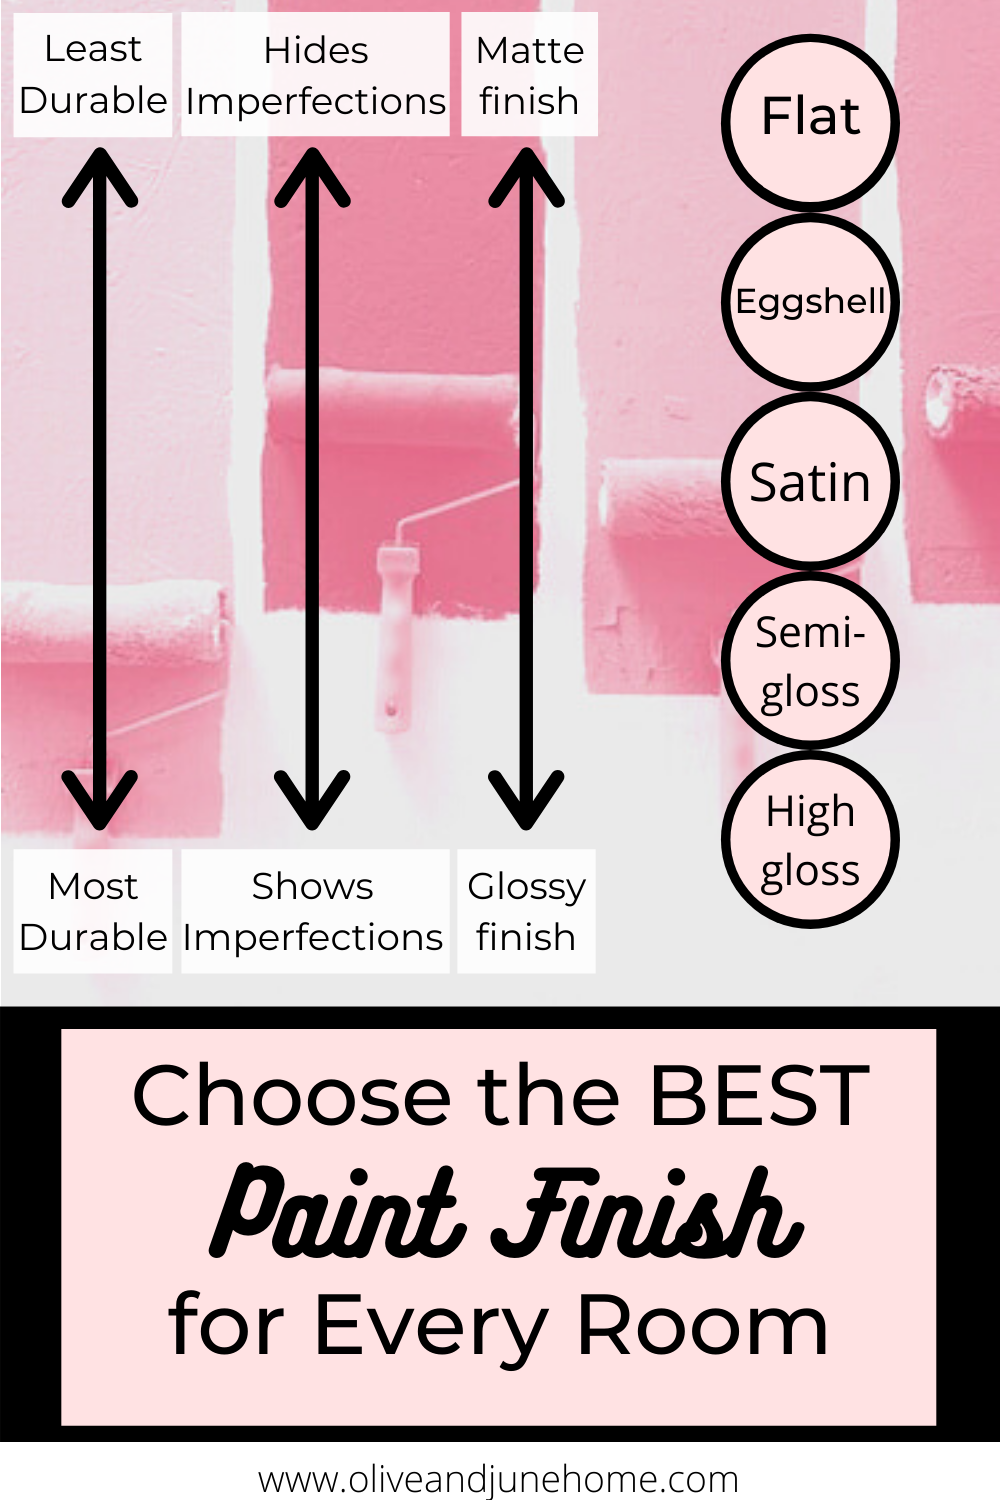
Choose the Best Paint Finish for Every Room
Sometimes I forget that not everyone has painted several houses worth of rooms and may not know what to say when the person at the paint counter asks, “what finish do you want that in?”. So this week, I’d like to bring back the basics and break down how to choose the best paint finish for every room in your house.
Ahhh… I remember the first time I painted a room. cue the “going back in time” squiggles I was a junior in high school and we had just moved into a new house. I was ecstatic because my parents let me paint my room however I wanted. I chose a soft, minty green color in a satin finish and flat black trim.
The color of the room was actually pretty classy and surprisingly the finish wasn’t too off-base either, unlike my mom who painted the rest of the house in semi-gloss even though I told her it would look weird (and it did).
But although I got lucky and made a couple of good decisions, they weren’t educated. And I certainly didn’t get lucky with all my painting decisions in my room, considering I painted the trim in a flat finish and painted the ENTIRE room (ceiling too) with the same paint I used on the walls. I’ve learned a lot since then.
My point is, we all have to start somewhere. Sometimes I forget that not everyone has painted several houses worth of rooms and may not know what to say when the person at the paint counter asks, “what finish do you want that in?”. So this week, I’d like to bring back the basics and break down how to choose the best paint finish for every room in your house.
How to choose a paint finish
When choosing a paint finish, you can most definitely just choose what you think would look good (it’s your house, after all). But there are different finishes for a reason. It’s important to know what the purpose of each finish is before committing if you want a nice looking end product.
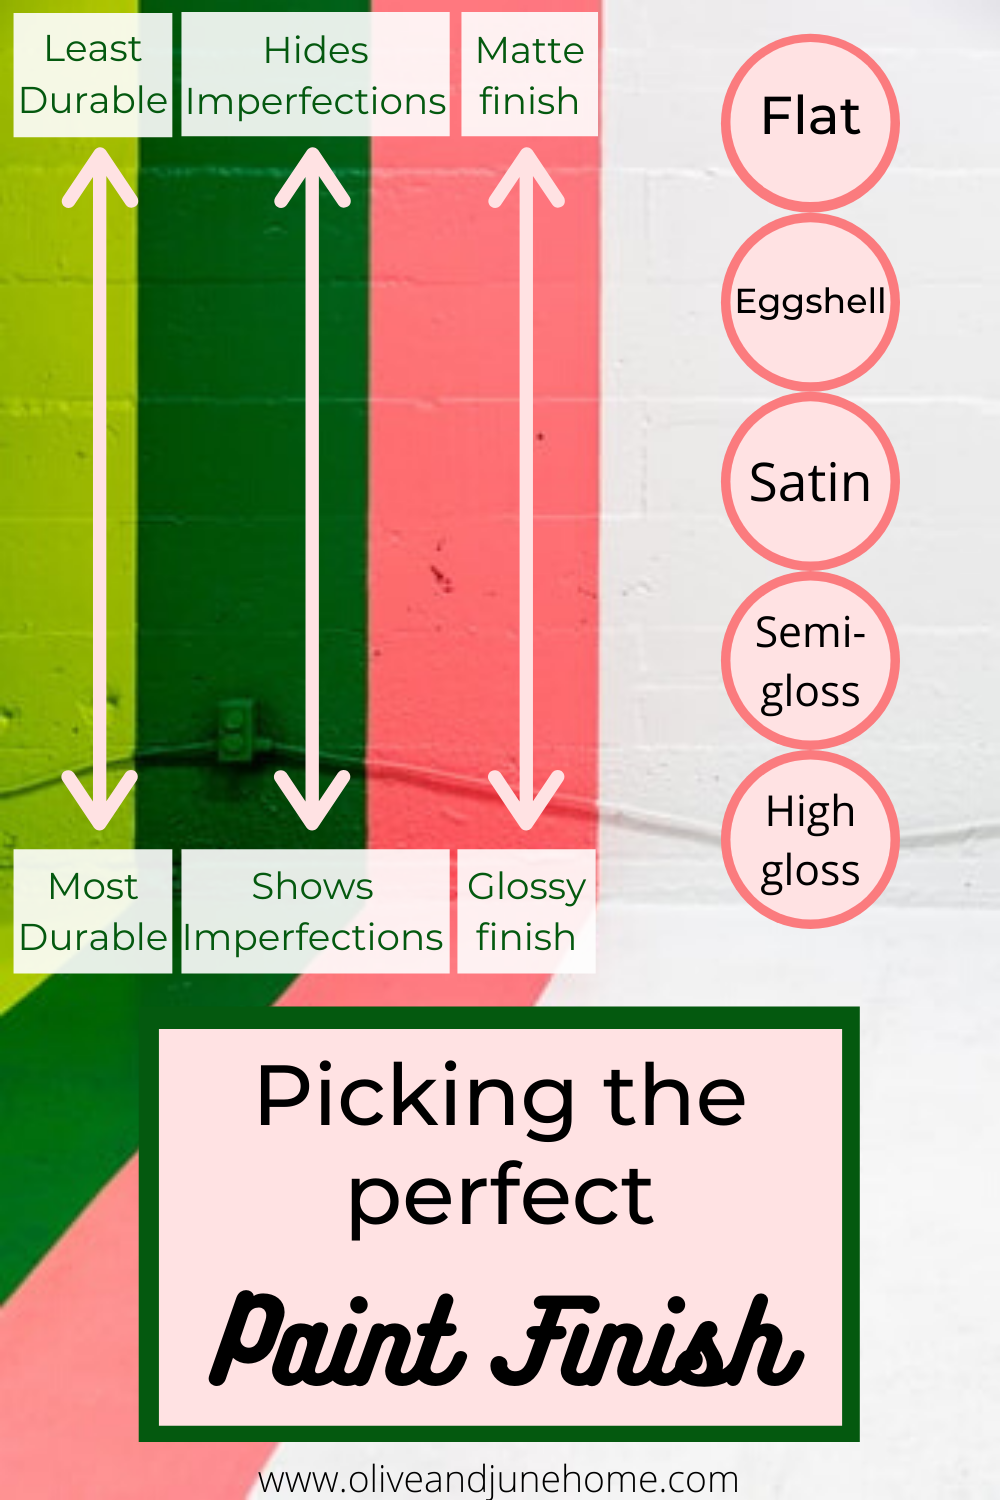
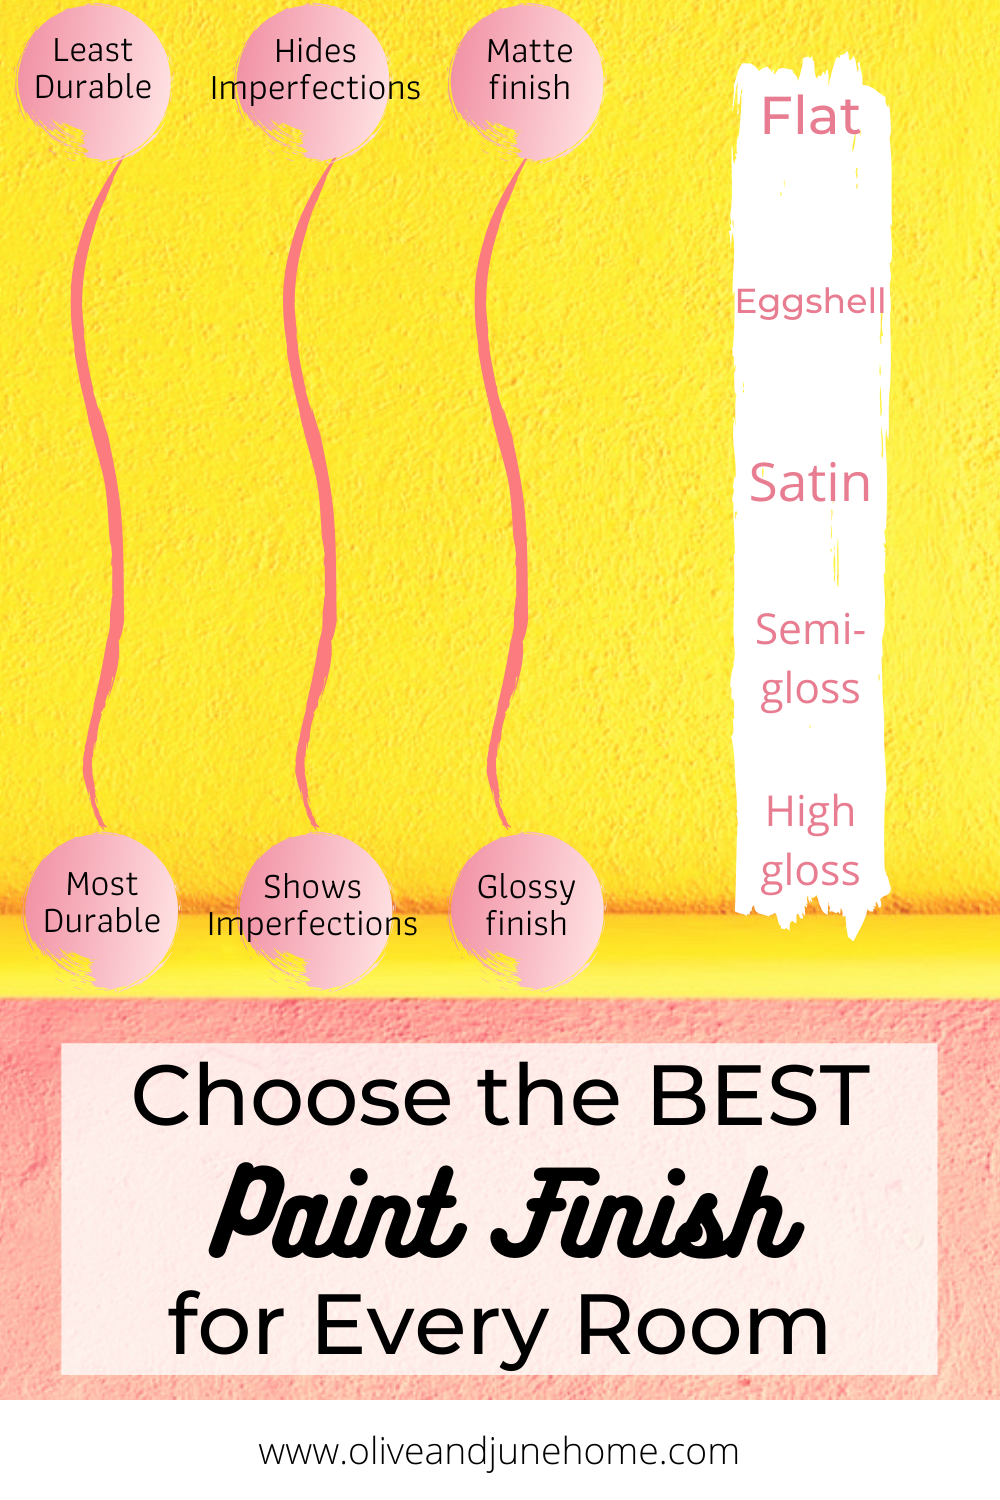
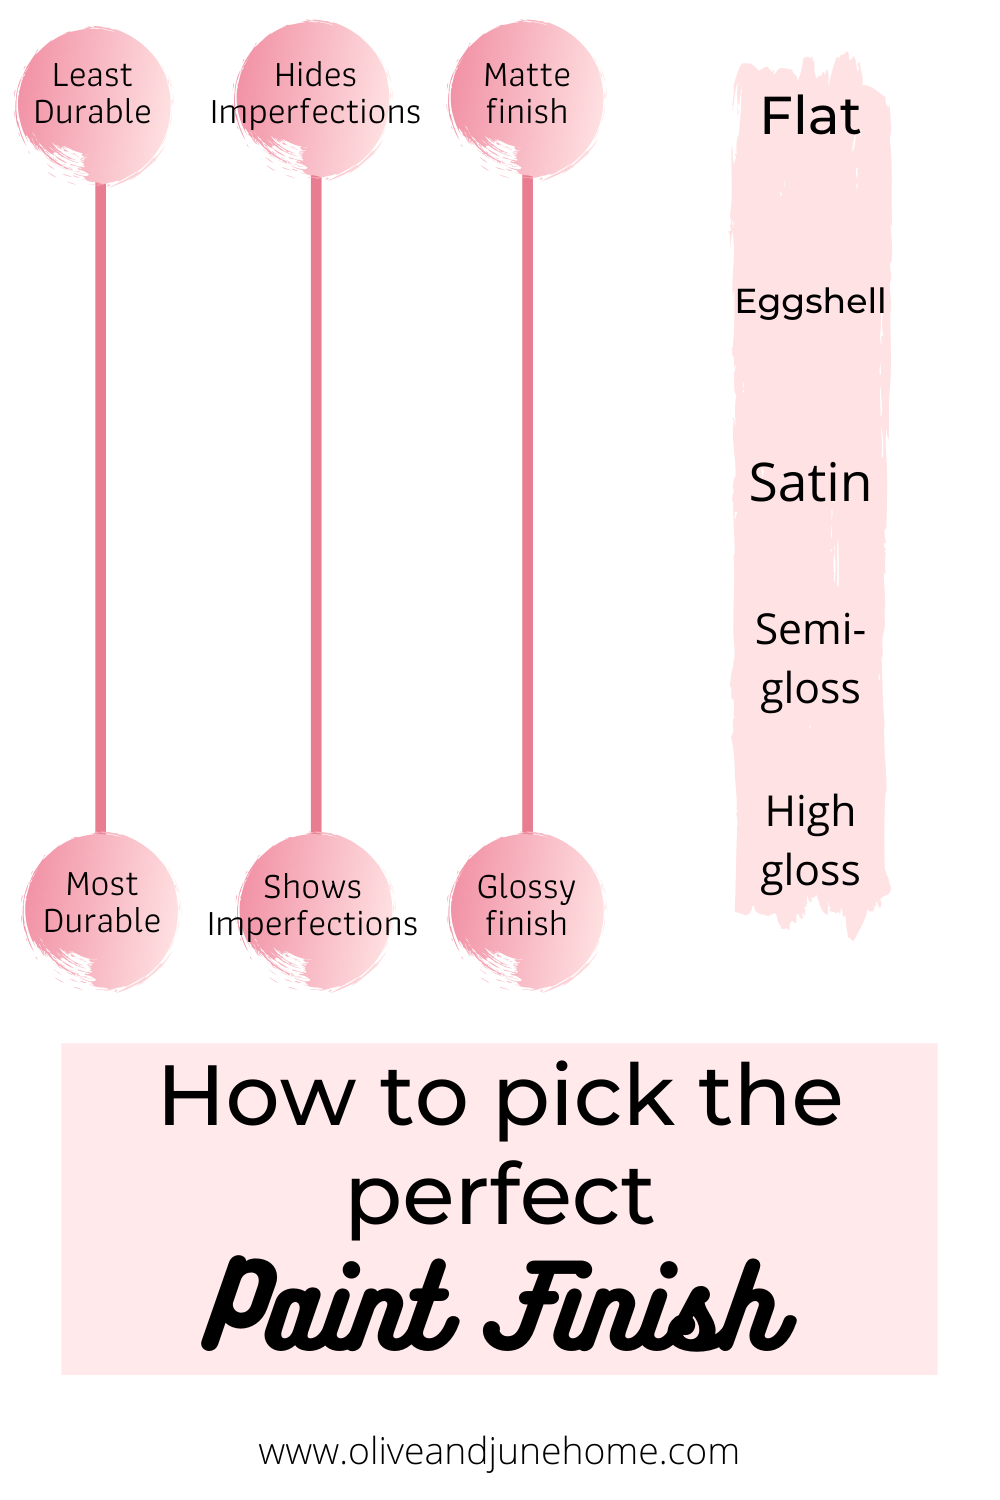
There are 5 main finishes: flat, eggshell, satin, semi-gloss, and high gloss, and 3 main aspects of each paint finish: sheen, imperfections, and durability. Below I break down how each finish stacks up and where in your home they should be used.
Flat
Sheen: Flat paint is… well, flat. Pretty self-explanatory. It’s a matte finish and doesn’t reflect light.
Imperfections: Because of its matte finish, flat paint is very good at hiding imperfections.
Durability: Flat paint tends to hold on to dirt and is difficult to clean and wipe down.
Where to use it: Low traffic areas, ceilings, or on walls with lots of imperfections (like old plaster walls)
Eggshell
Sheen: Low sheen, like an eggshell. Also pretty self-explanatory.
Imperfections: Still pretty good at hiding imperfections.
Durability: Slightly easier to clean than flat paint.
Where to use it: Low to moderate traffic areas - living rooms, dining rooms, adult bedrooms
Satin
Sheen: Moderate sheen
Imperfections: Less good at hiding imperfections
Durability: Easier to clean
Where to use it: Moderate traffic areas, like kids’ bedrooms and hallways or in areas with moisture, like kitchens and bathrooms.
Semi-gloss
Sheen: Moderate to high sheen, slightly glossy and reflective
Imperfections: Not good at hiding imperfections
Durability: Easy to clean
Where to use it: Moderate to high traffic areas like on trim, doors, and cabinets or in areas with moisture like kitchens and baths.
High gloss
Sheen: High sheen, very glossy and reflective
Imperfections: Bad at hiding imperfections
Durability: Easy to clean
Where to use it: High traffic areas, like on trim and doors
If you’re still not quite sure what these finishes look and feel like, just ask the associate at the paint counter if you can see a sample of the different finishes. A lot of times they’ll have a little sample with each of the finishes displayed to better help you make your decision.

Now that you know the “rules” of choosing a paint finish, you can have some fun with it and throw those rules out the window!… with caution.
A great example of this is painting a design on a wall using the same color in two different paint finishes.

Or painting an entire room - walls, trim, molding - with the same color and finish.
Or even painting the whole room (including the ceiling) the same color in a high gloss finish.

At the end of the day, it’s your house so do what speaks to you and makes you swoon. But at least now I’ve taken the guesswork out of it for you, so the next time you order a gallon of paint you won’t be caught off guard. Happy painting!


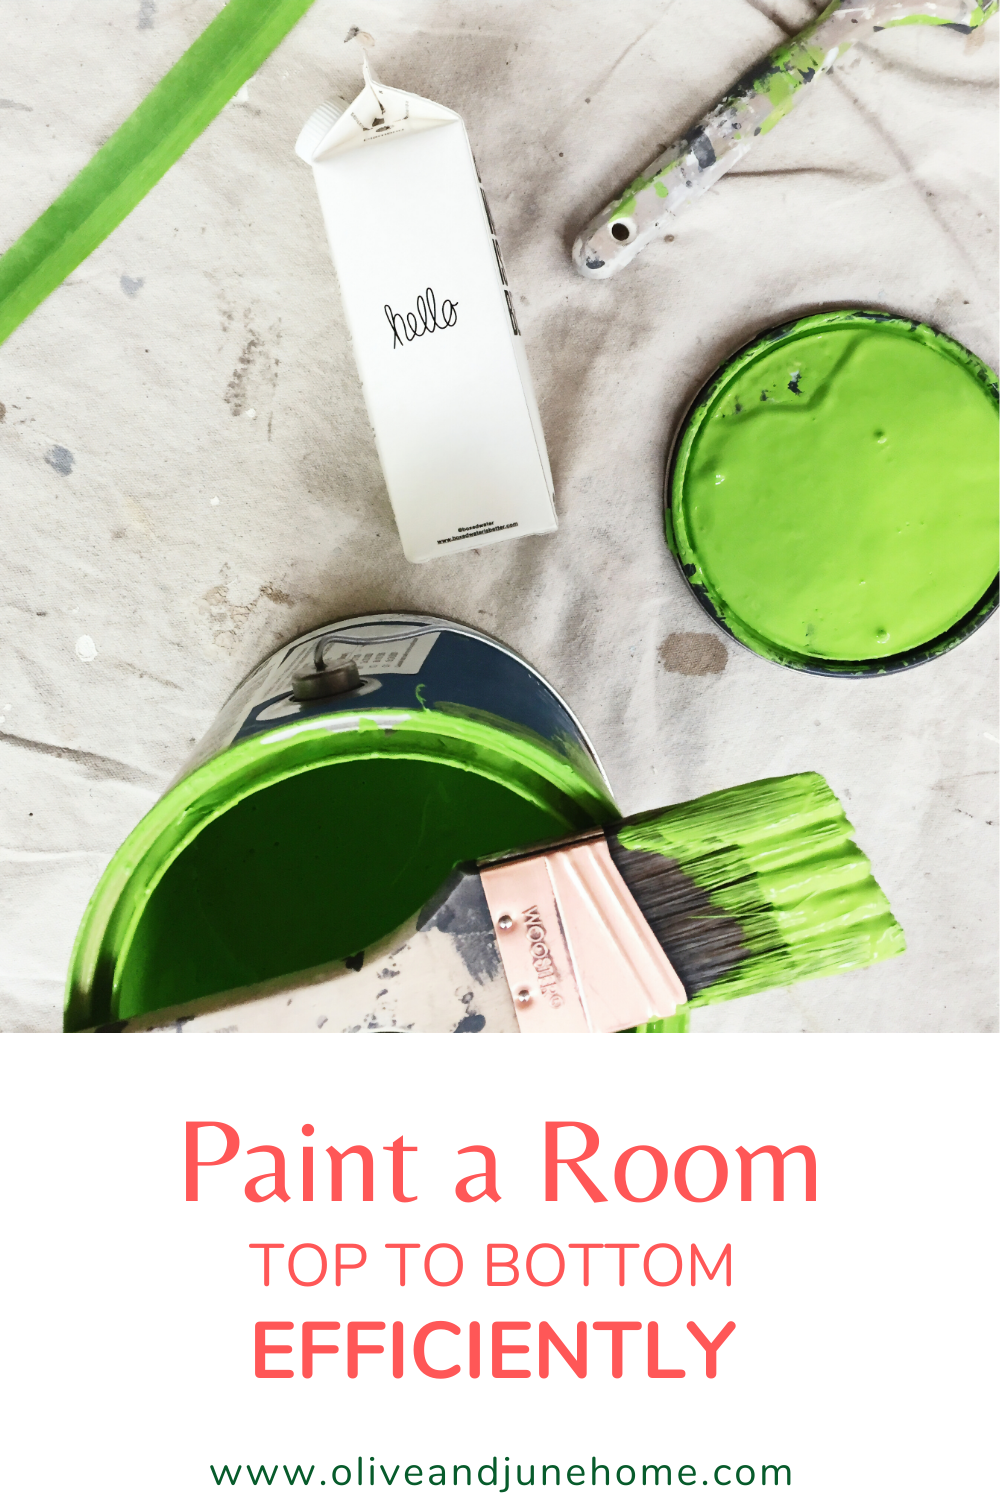
How to: Paint a Room Top to Bottom Efficiently
Remember back in math class when they taught you the order of operations - PEDMAS (or, Please Excuse My Dear Aunt Sally, as I like to remember it)? I've never been good at math, but I do know that the order of operations is an integral part of it. Well, I believe there’s an order of operations to painting a room that makes it easier and faster to complete. And I’m here to break it down for you!
The Best Way to Paint a Room
Remember back in math class when they taught you the order of operations - PEDMAS (or, Please Excuse My Dear Aunt Sally, as I like to remember it)? I've never been good at math, but I do know that the order of operations is an integral part of it. Well, I believe there’s an order of operations to painting a room that makes it easier and faster to complete. And I’m here to break it down for you!
Not all of these steps apply to every room, but you can skip any unnecessary steps for your specific project and just hop on over to the next applicable one.
And just for fun, here’s the acronym for the steps and some weird phrases to help you remember it (because I clearly have too much time on my hands): Prep work, Prime, Caulk, Trim, Ceiling, Walls - PPCTCW
Pretty People Call Tom Cruise Weekly
Punk Princesses Create Tortured Comic Worlds
Philosophical Penguins Cry To Callous Wombats
Okay, I’ll get to the post now… (but feel free to send me any phrases you come up with because they make me laugh).
As an Amazon Associate, I earn from qualifying purchases. This post may contain affiliate links, meaning I receive commissions for purchases made through those links, at no cost to you.
Prep work
First thing’s first - to get a great-looking finished product, you have to put in the time and effort of creating a solid foundation. That means prepping your walls (and ceiling if you’re painting that too) by patching any holes. Once your holes are patched, make sure to sand them smooth. If you’re patching a large hole and it isn’t smooth on the first go-round, slap another layer of spackle on it and sand again once it’s dry.
I get it, it’s frustrating not to be able to just jump into painting your room, but that uneven spot will drive you nuts if you don’t fix it now.

Once everything is sanded, vacuum/wipe down surfaces to remove any dust build-up, especially on the tops of door frames, window frames and sills, and your trim. And don’t forget to remove any outlet or light switch covers!
Prime
This is where you get to have a little bit of fun if you’re repainting the whole room because you can go nuts and you don’t have to be careful at all.
In my office, for example, I knew I was getting rid of the red trim and blue walls. So I slapped a coat of primer on everything. And because I had to patch a few areas on the ceiling anyway and I was therefore going to have to repaint that too, other than making sure I wasn’t getting any paint on the floor, there was no need to carefully edge around anything. It was kind of liberating, in a way.


If you’re not painting everything in a room, you’ll obviously need to be more careful in how you apply your primer. Or, you may not even need primer at all if you aren’t drastically changing the paint color. In my office, I plan on using white paint on the walls and trim, so primer was a must to cover up the bold colors it was painted when we moved in.
On the flip side, if you are drastically changing the color in a room but you’re going from a light to a dark paint or from a bold to a more muted paint (like we did in our loft) save yourself some time and money by having your primer tinted.


Bonus: primer is a great way to highlight any nail holes you may have missed initially. If you find any stragglers, just spackle over them, sand, and call it a day!
Caulk
To create a nice, seamless look, caulk any gaps between your trim and your walls. I like this kind.
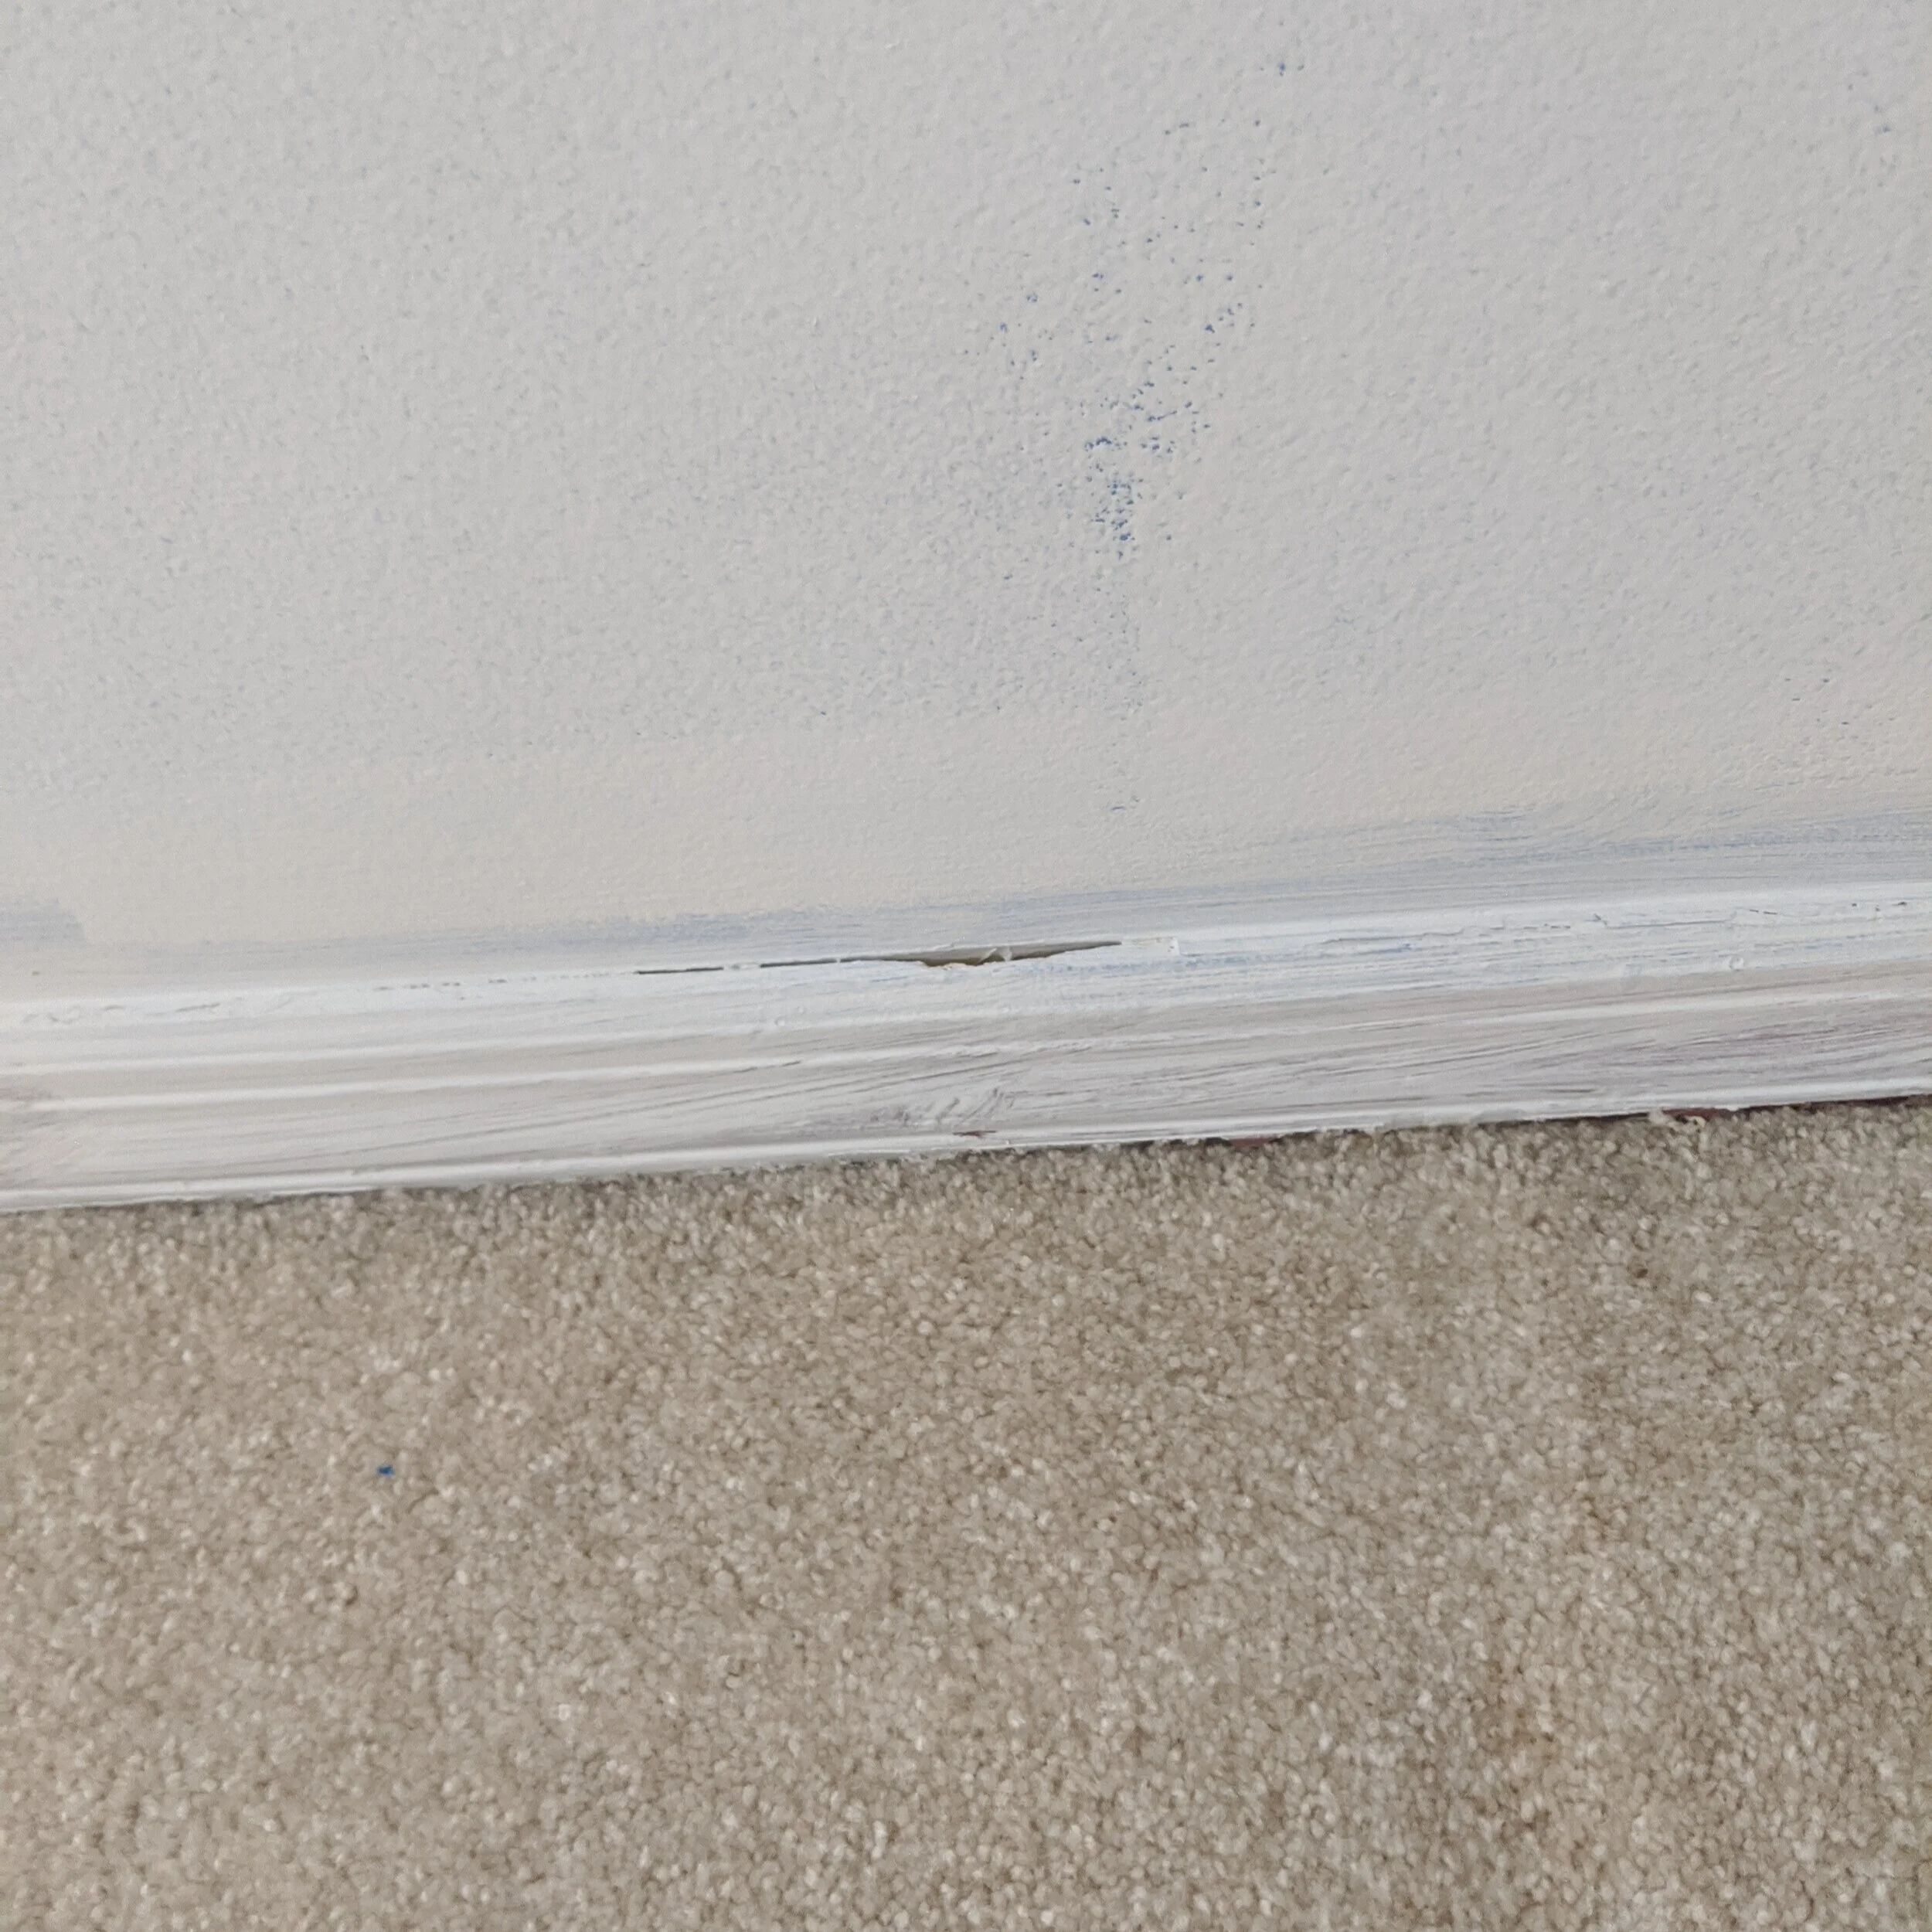
I’m coming for you, gap.
Caulking is simple. Just cut the tip at an angle, run a bead along where the wall and trim meet and smooth it with your finger. I like to keep an old rag handy to wipe off my hands, and it’s helpful if you wet the tip of your finger before you smooth it out.
Trim
As with primer, if you’re painting the whole room, you really don’t have to be careful to cleanly cut in your edges. If you’re painting your walls, paint the trim first and go to town.
I love to paint, but painting trim is one of my least favorite things. What makes it even worse is that the trim in our current house is small and thin and it’s really hard to not get any on the walls. At least when I use this order of operations it makes the chore of painting trim a little easier. Since I’ll be painting the walls once the trim is complete anyway, when I paint the trim I don’t worry about using tape to keep any paint from getting on the walls.
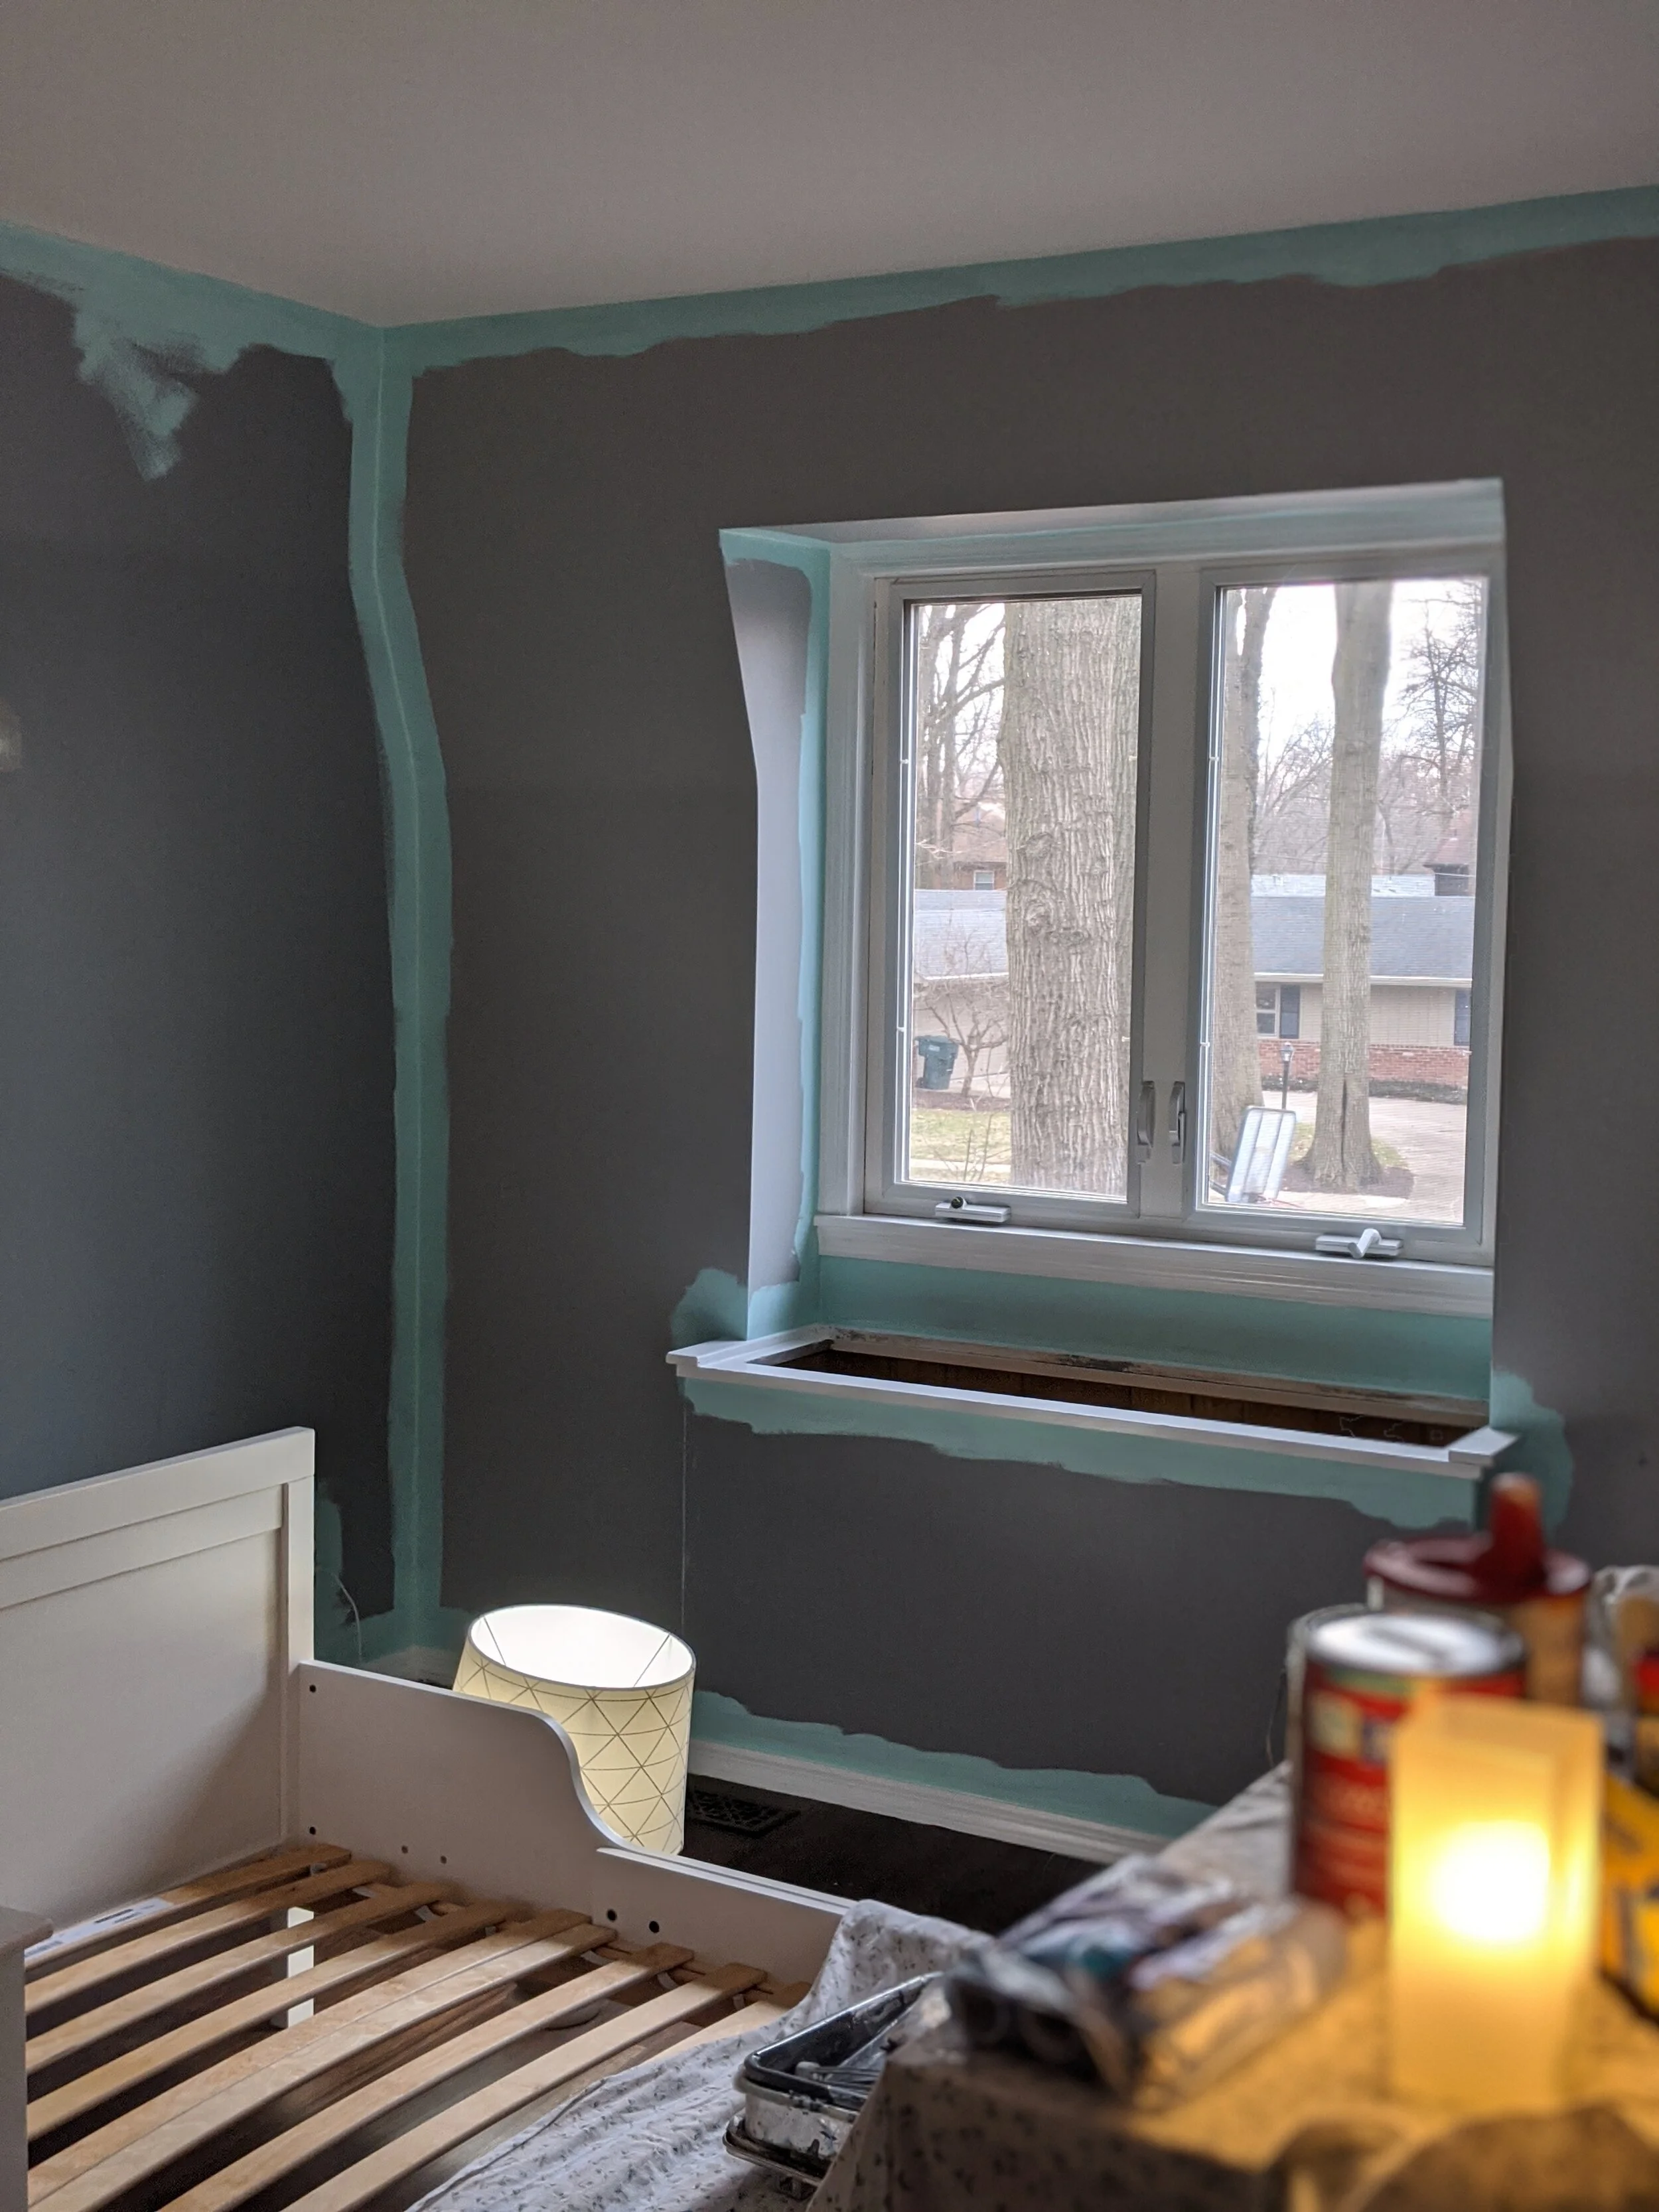
Here’s a picture of our daughter’s room in progress. The wall color wasn’t changing drastically so I didn’t worry about primer. Because I knew I was going to paint the walls later, I painted the trim first and didn’t worry about “staying in the lines” while doing it!

You do, however, want to make sure you’re not going so crazy that you paint your floor. You can put some painter’s tape on the floor to protect your surface, or even use a large putty knife to block your brush from touching the floor as you paint your trim.
Ceiling
Unless you have crown molding (that would have already been painted in the last step), or you’re only painting the ceiling (and not touching the walls), you don’t need to worry about carefully cutting in your edges in this step either!
Walls
FINALLY, the moment you’ve been waiting for that will make all the difference in your room and straight up blow your socks off: you can now paint your walls! At this point, you’ll definitely want to be careful when cutting in because you just spent all that time painting your ceiling and trim.
I like to start by cutting in my edges, but some people prefer to roll their paint first and that’s totally okay! I prefer to use a short 2” angled brush. Definitely feel free to use painter’s tape if you don’t have a steady hand.
Then use a roller to roll the rest of the paint on your walls.
I don’t care what the paint companies say: I will never believe that “one-coat coverage” is a thing. Yes, the paint may cover well with one coat, but I guarantee there will be areas where you may have left the paint a little thin or didn’t quite get into the texture of the wall enough. Do your walls a solid and just paint two darn coats.
Sit back and enjoy
Now that you just put a ton of work into your room, ENJOY IT! You earned it!
For more painting-related posts, check out the articles below:
Tips and Tricks for Painting a Room Quickly

How to Paint an Ombre Wall in 5 Easy Steps
Unlike most people, I love painting. I love it so much I got my BFA in painting - true story! Not only do I love painting paintings, I also love painting rooms. I love the process of turning my mind off, getting in the zone, and drastically changing the look of a room in just a few hours with a gallon or two of paint. Let’s be honest - some of that might be the paint fumes talking.

Unlike most people, I love painting. I love it so much I got my BFA in painting - true story! Not only do I love painting paintings, I also love painting rooms. I love the process of turning my mind off, getting in the zone, and drastically changing the look of a room in just a few hours with a gallon or two of paint. Let’s be honest - some of that might be the paint fumes talking.
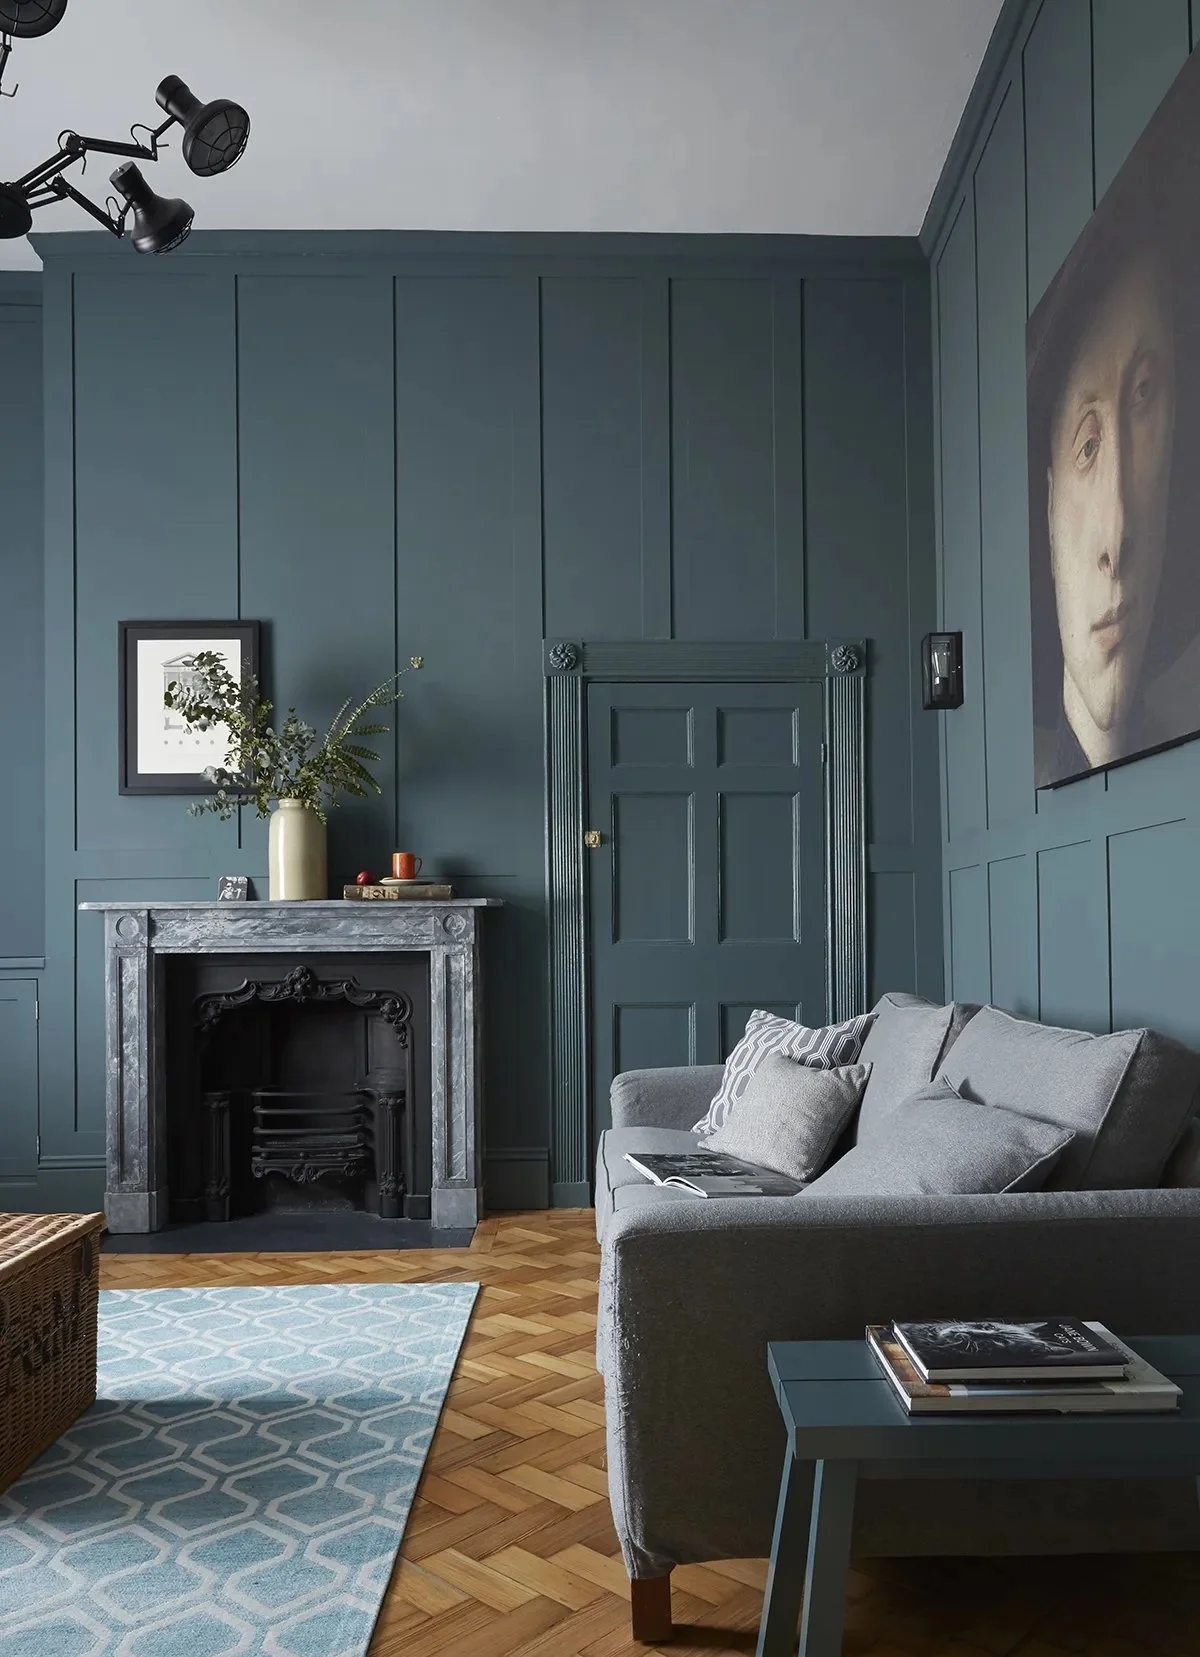
Although it’s not appropriate in all rooms, I love trying new things with paint. Whether it’s adding a simple accent wall that’s a couple shades darker than the main color or painting a room a bold, dark, moody teal to creating a stencil to make a design or (in my most recent room makeover) painting an ombre wall.


As I mentioned in this post, once I got sucked into the world of ombre walls on Pinterest, I knew I had to give it a try. Ombre walls are definitely trending right now, and as with any trend there’s always the fear that it’ll go out of style. You know another thing I love about paint? It’s SO easy to change if that happens! Plus, I figured if I could pull it off, it would look amazing. So off I went!

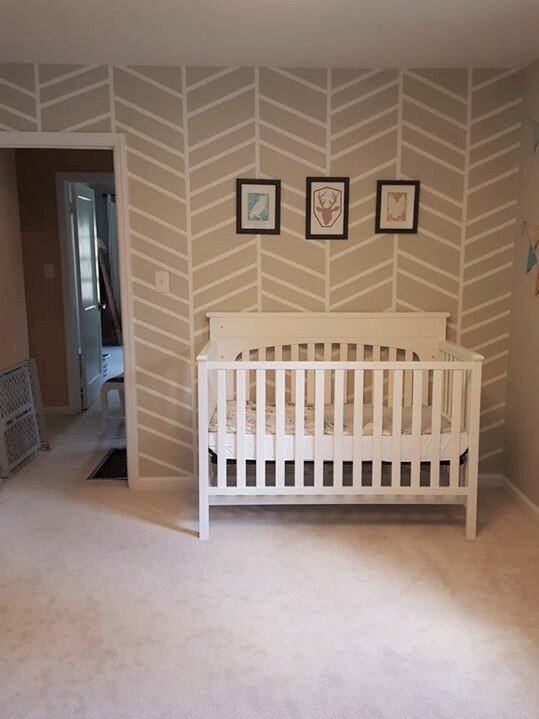
I was so excited to work on our daughter’s room and take it from the dark, light-sucking blue/gray we inherited to something bright and girly.
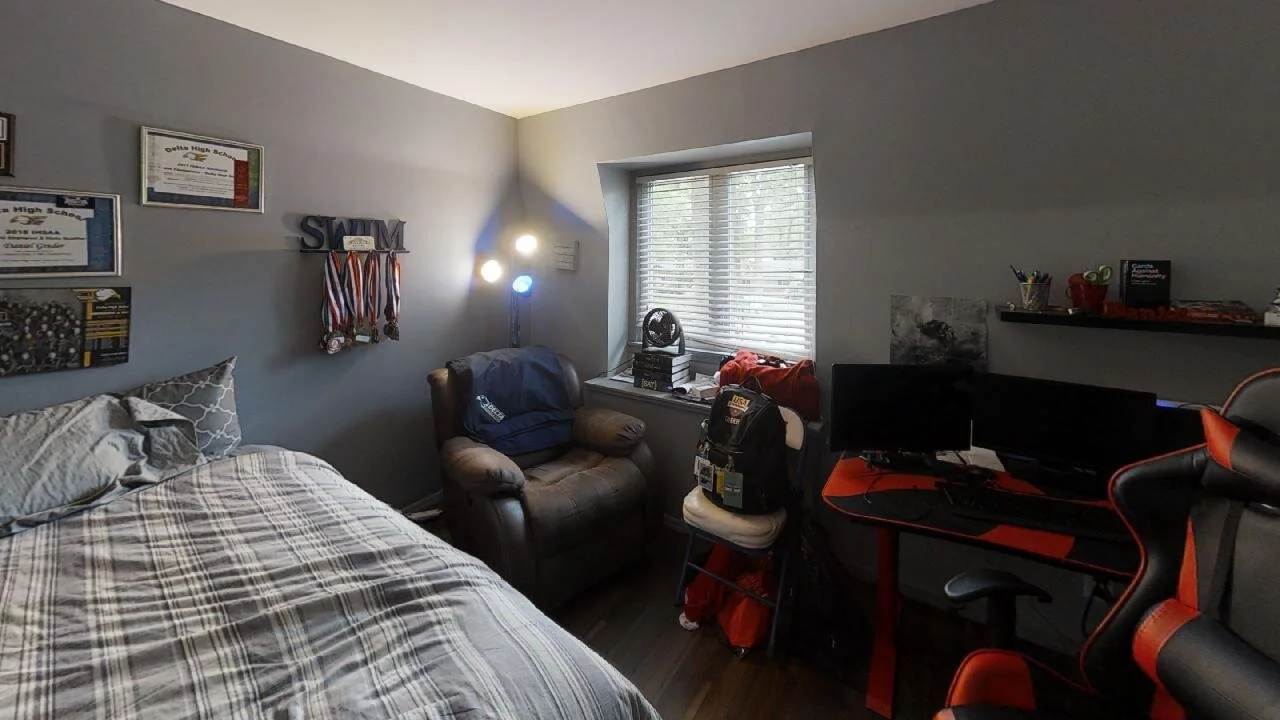
This is our daughter’s room from the listing photo. It worked for the teenage boy who resided here, but for a four-year-old girl? No way.
Picking a color
For some reason I couldn’t shake the idea of using pink and teal in this room, so then it was just a matter of picking the exact paint colors.
I love to hang out in the paint section at Lowe’s. I take so many paint chips that I might just single-handedly keep someone in a job constantly restocking them. I actually created our younger daughter’s mobile with paint chips I collected over time and for some reason felt the need to keep. (You can check out how I made the mobile HERE.)

This project was no different. I headed over to Lowe’s and grabbed a whole bunch of colors in the family I was thinking of and taped them to the wall.
Then I let them hang out there until I got a chance to paint a few weeks later. Sometimes my paint chips only stay up for a day or two, but typically it’s much longer. I’ve had paint swatches on our living room wall for a few months, with no real timeline of taking them down. I actually like to leave them up so I can see how they look in all different sorts of light.
In the end, for this project, I went with the lightest shade of blue on the first blue swatch on the left (Tame Teal by Sherwin Williams) and the middle shade of coral in the first swatch in the second row (Coral Mist by Valspar).

Usually, once I decide on a color, I get a sample container of paint and paint big swatches on several different walls. Then I let it hang out for at least a couple of days to once again see how it looks in different light. I can be very indecisive, and paint colors can change drastically during different times of day, so I feel like these steps help me to be sure in my decision and not waste money on paint.
A gallon of paint isn’t that expensive, but it can definitely add up if you keep repainting because you don’t like the color you chose! Those little sample paint containers are only around $5 each and are well worth it if it helps you commit to a color. I know I said I love painting, but that doesn’t mean I want to paint the same wall over and over again.
In this room, I actually felt confident in my paint choice just by looking at the paint chips and didn’t end up following my own rules. I just grabbed a couple of gallons and went to town!
The Process
I painted all the solid walls first since those were run-of-the-mill and straightforward. Then it was a matter of painting the ombre wall.
I researched a lot of different tutorials and used the steps that I thought would work best. The step-by-step process is below including what I wish I had done differently.
One quick note - if you want a smooth transition from color to color, you have to work FAST. This can be intimidating. I pictured myself breaking a nervous sweat trying not to mess up the wall, but honestly, once I got started I just went with the flow and I love how it turned out.
Start by making light marks on the wall where you want your colors to transition.
Grab 3 paint trays and 3 rollers. Pour one color into one paint tray and the other color into another. In the third paint tray, pour equal amounts of both colors.
Make sure you mix enough of the combined color so you don’t have to mix more partway through (working quickly is the name of the game here), and so you don’t risk your new mixture mismatching the original.
Then, paint your color of choice on the bottom and the top. Since the goal is to have a smooth transition from one color to the next, don’t worry about taping anything off or painting a harsh line where the colors change.
Apply the mixed paint to the middle section of your wall, blurring the dividing line of color.
Using the roller you applied your mixed paint with, lightly dip your roller into the color on the top of the wall and start to soften the transition. Now do the same with the color on the bottom of the wall.
The most difficult part of this project, that no tutorial seemed to talk about, was what to do with the edges of the wall. Since your roller can’t get all the way to the edge, I used a brush to blend as well as I could. If you’re not good at cutting-in edges, apply painter’s tape to the adjoining walls before you begin.
And there you have it - how to paint an ombre wall. If you’d like to paint one in your house, I say, give it a try! It’s only paint, after all. If it turns out poorly, you can always paint over it. Easy peasy. Below is a list of supplies to help you get your ombre on. Enjoy!

Supply list
3 paint trays
3 rollers
1 paint brush
painter’s tape
2 gallons of paint (1 of each color) - this should be more than enough for one wall and you’ll have a lot of extra, but a quart won’t quite be enough.

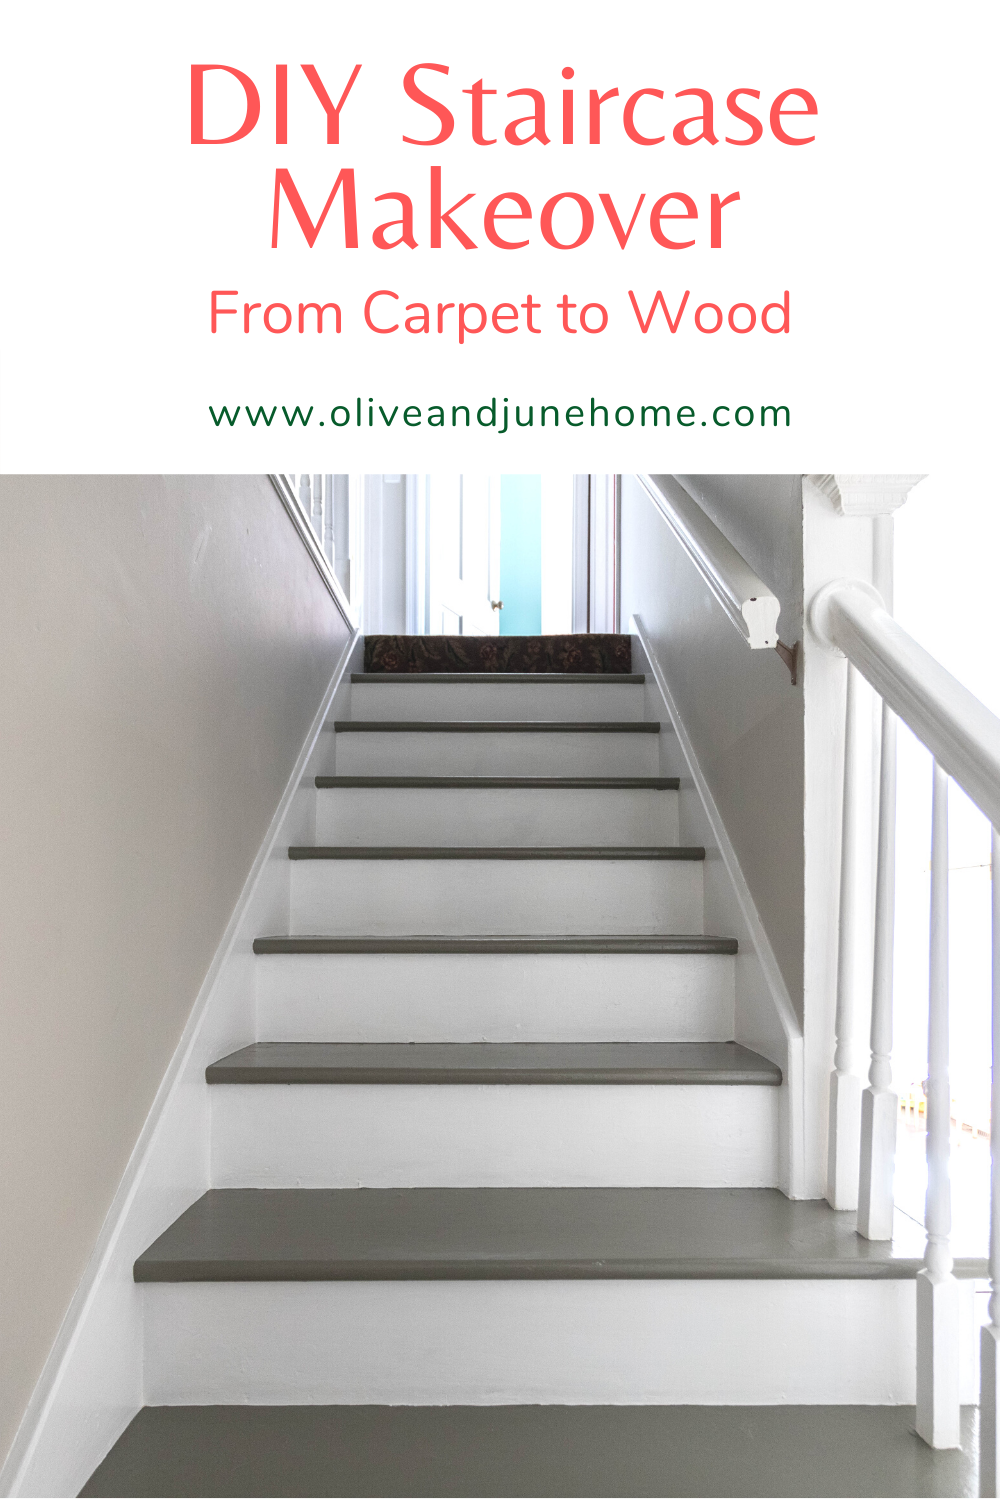
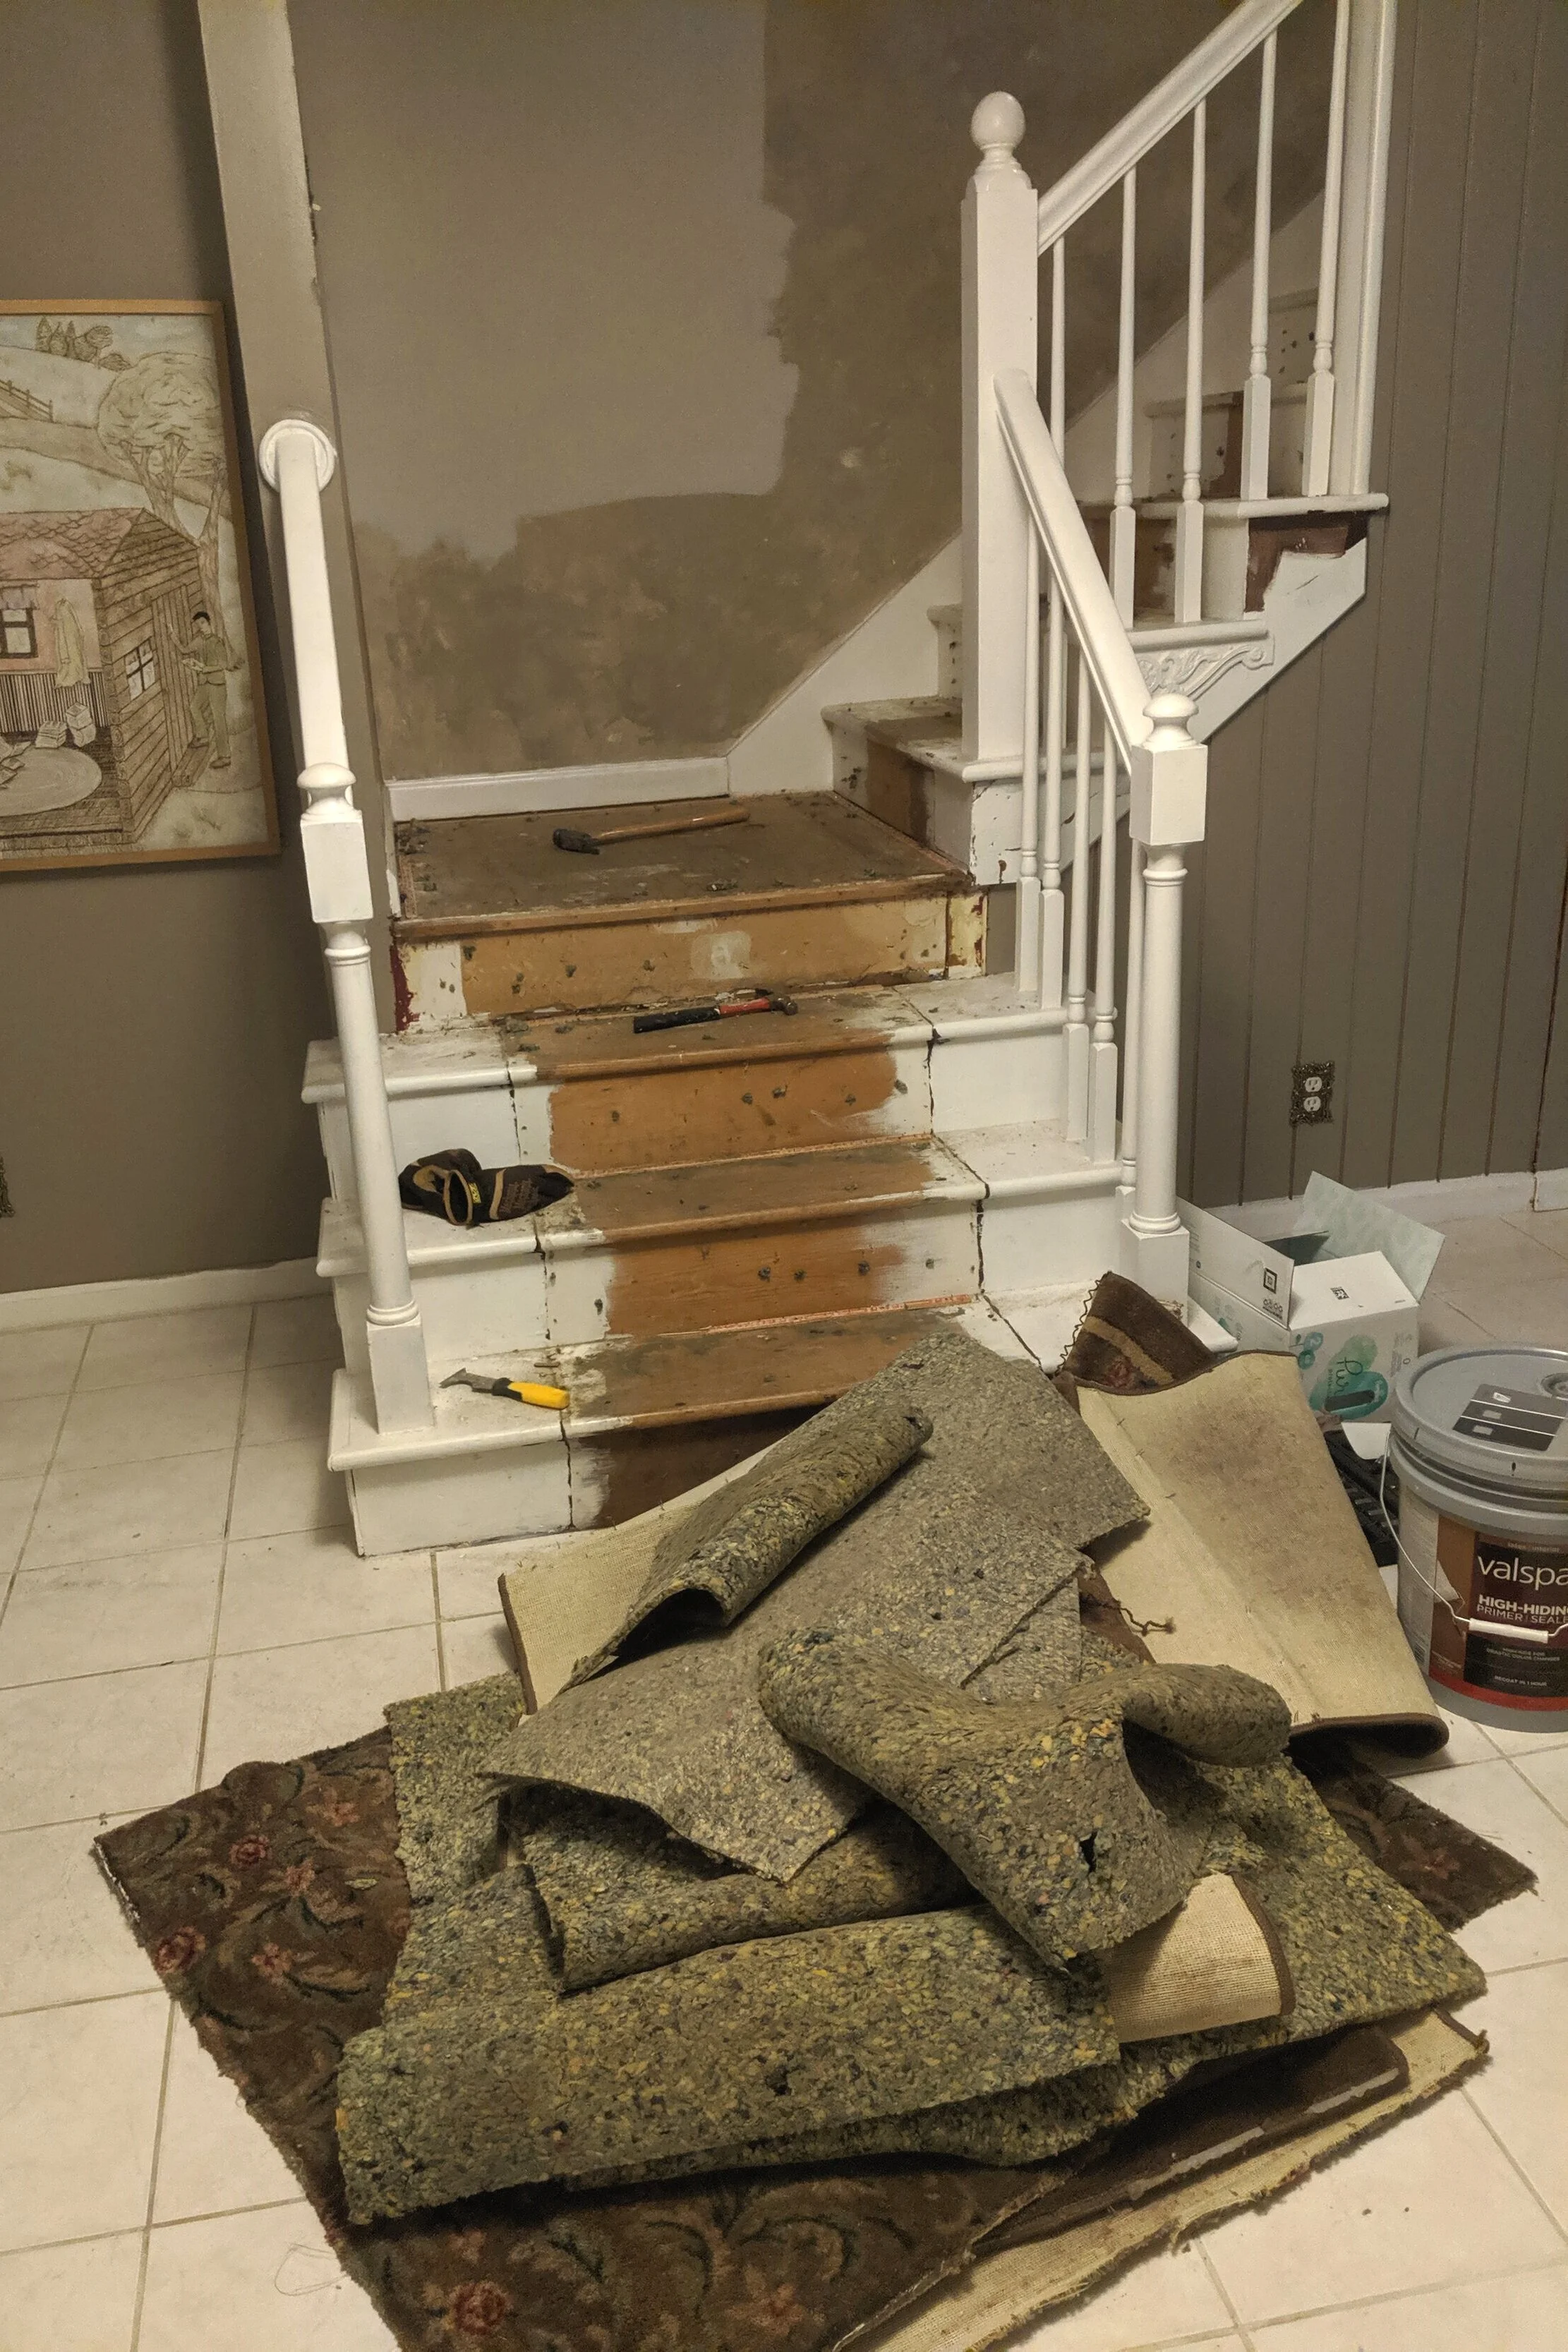
Painting our stairs, part 1
A few days after we moved into this house I took the day off work to get things organized. 8 hours later I had ripped the hideous carpet runner (and 8,000 staples) off the stairs. And 3 months later I got my butt in gear, painted our stairs, and haven’t looked back since!
How to Prep and Paint Your Stairs
A few days after we moved into this house I took the day off work to get things organized. 8 hours later I had ripped the hideous carpet runner (and 8,000 staples) off the stairs. And 3 months later I got my butt in gear, painted our stairs, and haven’t looked back since!

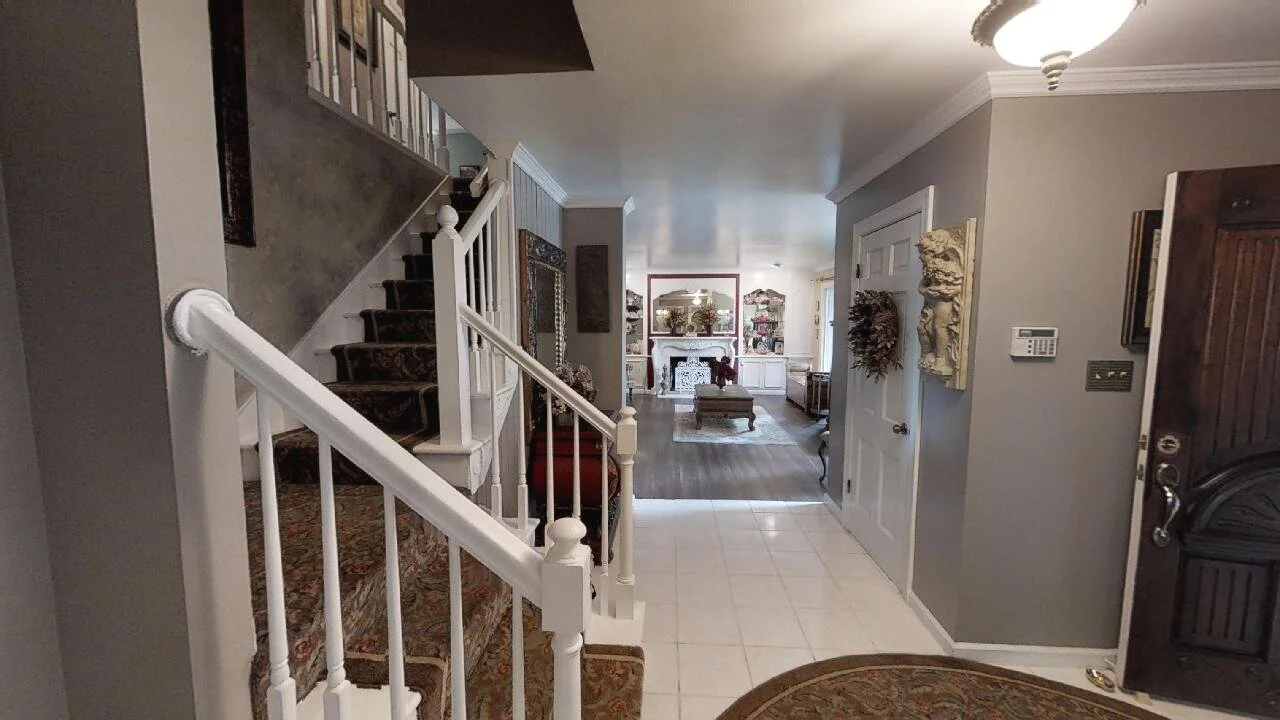
The carpet that was on the staircase when we moved in was dark, musty, and not to mention ugly. I couldn’t wait to get it out of there!

Picture from the house listing.
Carpet be Gone!
I didn’t get a chance to refinish the stairs at our previous house before we moved, so I was especially excited to get a chance to makeover these bad boys.
But after I ripped up the carpet, the stairs stayed bare… for 3 months. There are so many things in this house we want to get our hands on, so it was easy to get distracted painting the loft, the foyer, and our oldest daughter’s room.
But once those rooms were painted (though I don’t consider any of them to be complete yet), I felt like I could shift my focus back to the stairs. Here’s how I tackled them!
Getting started - prep work
(so.much.prep work.)
First thing’s first…. If you’re starting with carpeted stairs like I did, you’ll need some good pliers and work gloves to rip it out. Those saved my dainty little lady hands from a lot of pain.
Next, take out the staples. It’s tedious and will take a whole bunch of time, but getting all the staples out is key to a nice end product. Just throw on some music, a movie, or a podcast (if you’re a true crime fanatic like I am, I highly recommend My Favorite Murder) and get comfortable. You’re gonna be there for a while.
If you already have bare stairs, I’m jealous because you’re at a way better starting point than I was. Either way, once your stairs are bare, CLEAN THEM! I wiped mine down with a Magic Eraser and some water and was appalled (yet oddly satisfied) at how much dirt came off them.

Next, fill the crap outta all the little holes you just created with wood filler. Here’s what I used.
I went through so much more wood filler than I anticipated. Since the holes were so small, I just used my fingers to push the filler into them, rather than a putty knife.
Also, I learned a new trick - when your wood filler starts to dry out, add just a little bit of water and mix it together to revive it. Dry wood filler would rather stick to your fingers than the wood and it’s infuriating. This trick saved the stairs from a lot of unkind words.
As you can see below, I wasn’t shy about filling in not just holes, but also dents, nicks, and cracks.

Once your wood filler is dry, you’ll need to sand off the excess.
I started sanding by hand and after about an hour when I had only completed 3 stairs Lucius asked me why I wasn’t using our palm sander. In my stubbornness, I almost said, “I’m too far in!” and kept painstakingly sanding by hand, but my reasonable side luckily stepped in and said, “girl, just try it”. And I’m so glad I did.
Although the palm sander spread dust EVERYWHERE (like, I really should have closed the bedroom doors before I started), it was way faster than hand sanding and the end product was a lot more smooth and consistent.
Our sander is similar to this one and I used 100 grit sandpaper. I could have/maybe should have used a finer grit, but 100 grit was what I had on hand and I didn’t notice any significant scrapes or roughness so I think it turned out fine. You could also use an orbital sander.
Once your sanding is complete, you need to thoroughly clean the stairs again. I started by vacuuming the stairs. Then I gently wiped them down with wet paper towels. I didn’t want to wipe the wood filler out of any crevices so I opted not to use a Magic Eraser this time. At this point, I realized it was a good idea to caulk any gaps or cracks to make everything look seamless. Make sure you’re using paintable caulk for this.
FINALLY, it was time to prime! I planned on using a latex primer, but ended up using oil for two reasons: 1 - I feel that oil primer typically dries harder and holds up better, and 2 - I have a stupid amount of oil primer on hand. I should really stop buying more before checking my stock first.
I typically steer away from oil-based paints and primers because of the VOCs (fumes and chemical off-gassing), and the fact that you have to use mineral spirits or paint thinner to clean your tools after you use them, which feels chemically and gross to me. But since stairs need to be pretty darn durable (compared to a wall that no one will be walking on several times a day), it made sense in this situation. I used Killz Original Oil-based Primer and applied it with a cheap brush similar to this that I could just throw away when I was done.
I knew there would be holes that I missed while filling the first time around. Adding a coat of primer to the stairs helped identify any holes I missed as well as some stray staples. I pulled out the remaining staples and filled the rest of the holes.

After this round of wood filler dried, I had to sand again. I didn’t want to sand off the primer, and there were way fewer areas to sand this time around, so I just sanded these areas down by hand.
Afterward, I vacuumed the stairs again, and to take it a step further to make sure the stairs were super duper clean before I put down my first layer of paint, I wiped them down with tack cloth. Tack cloth is just a sticky version of cheesecloth used for picking up dust and small particles for jobs just like this. It’s super inexpensive (less than $2.00 for two of them) and well worth it.
The exciting part - Painting!
After hours of prep work, I was so excited to get some uniform color on these sad, ugly stairs. I knew I wanted to paint the stairs, rather than buying an actual runner. I hate vacuuming stairs, so painting the stairs was really the only option. For the last several months, I had been researching different design ideas. Here were the three contenders:


The third example is actually a carpet runner, but I did consider painting a runner (without the extra stripes on either side like the one in the middle) in a similar color. The third example also has the treads painted a different color than the risers so I guess I had 4 ideas I was considering. Initially, I was really leaning toward painting a runner similar to the second and third options above, until I covered the stairs with rosin paper between work sessions…

…and realized how much more narrow the stairs felt. This stairway is already fairly narrow, and the “runner” just seemed to emphasize that. At that point, it was pretty clear that I needed to lose the idea of painting any kind of runner and just focus on painting the treads, like in the first example above.
From doing loads of research I knew I needed to buy floor paint for this project, so off to Lowe’s I went! And I was honestly kind of underwhelmed. Usually, I LOVE Lowe’s (and frequently refer to it as the happiest place on Earth… and may have seriously considered working there part-time when I retire years and years from now), but their selection of paint for this project seemed to be lacking. Valspar seemed to be my only choice of paint and only in a select range of colors and sheens. I ended up grabbing a quart of this in satin in a tan color called Covered Bridge and applied it with my preferred 2-inch angled brush.
Once I started on the first tread, I quickly realized that I needed to break out my painter’s tape. Painting under the lip of the tread (the part of the stairs you step on) without getting a ton of paint on the risers (the vertical parts of the step) was proving trickier than I thought. Typically I don’t use painter’s tape (I feel like it gives me a false sense of security and I usually end up making a bigger mess), but with this project it was necessary.
Finally, I was able to get to painting the treads, which was so, so satisfying. This part really only took about an hour for all the treads.
When I got to the bottom and looked up I was… again underwhelmed. The color clashed a little bit with the greige walls (it looks like it matches perfectly in the pictures, but trust me, it clashed) and although it lightened the staircase and looked cleaner, there was just something missing. The next day when Lucius walked up the stairs in his shoes and left prints on the freshly painted treads, I knew that I had to buy a different sheen anyway, so I decided to take that opportunity to check out some other colors too.


Back to Lowe’s I went!
I looked over the colors and decided to go with something darker and with a little more gray in it to pull out some of the grays in the walls, rather than the beige. The color I used was Elkhorn Cactus, and I was immediately happier with it. Unfortunately, the only sheen available other than satin was gloss, and they didn’t have any additives that I could buy to add texture. I’m a little nervous about the glossy sheen, but we’ll give it a little while and if there’s too much slipping and sliding going on, I’ll consider adding some anti-slip tread covers, like this.

Final Thoughts
Our stairs are now looking a bajillion times better than what we started with, but there’s still lots of work to be done - painting the handrails, newel posts, and balusters, and figuring out what in the world we’re going to do with the landing.
In case you didn’t notice in the pictures above, the landing is its own animal. Below is a picture to save you from scrolling back up.

The above is actually an improvement from what we started with when I pulled the carpet off - knotty, thin plywood. But it’s similar to an MDF type material and I really don’t think it’ll stand the test of time, so we’ll find a better solution.
Once we come up with a game plan for the landing, I’ll be sure to write a step-by-step (hah, I couldn’t help myself…) post about it and show the complete, finished product. In the meantime, stay tuned. This story isn’t over yet.